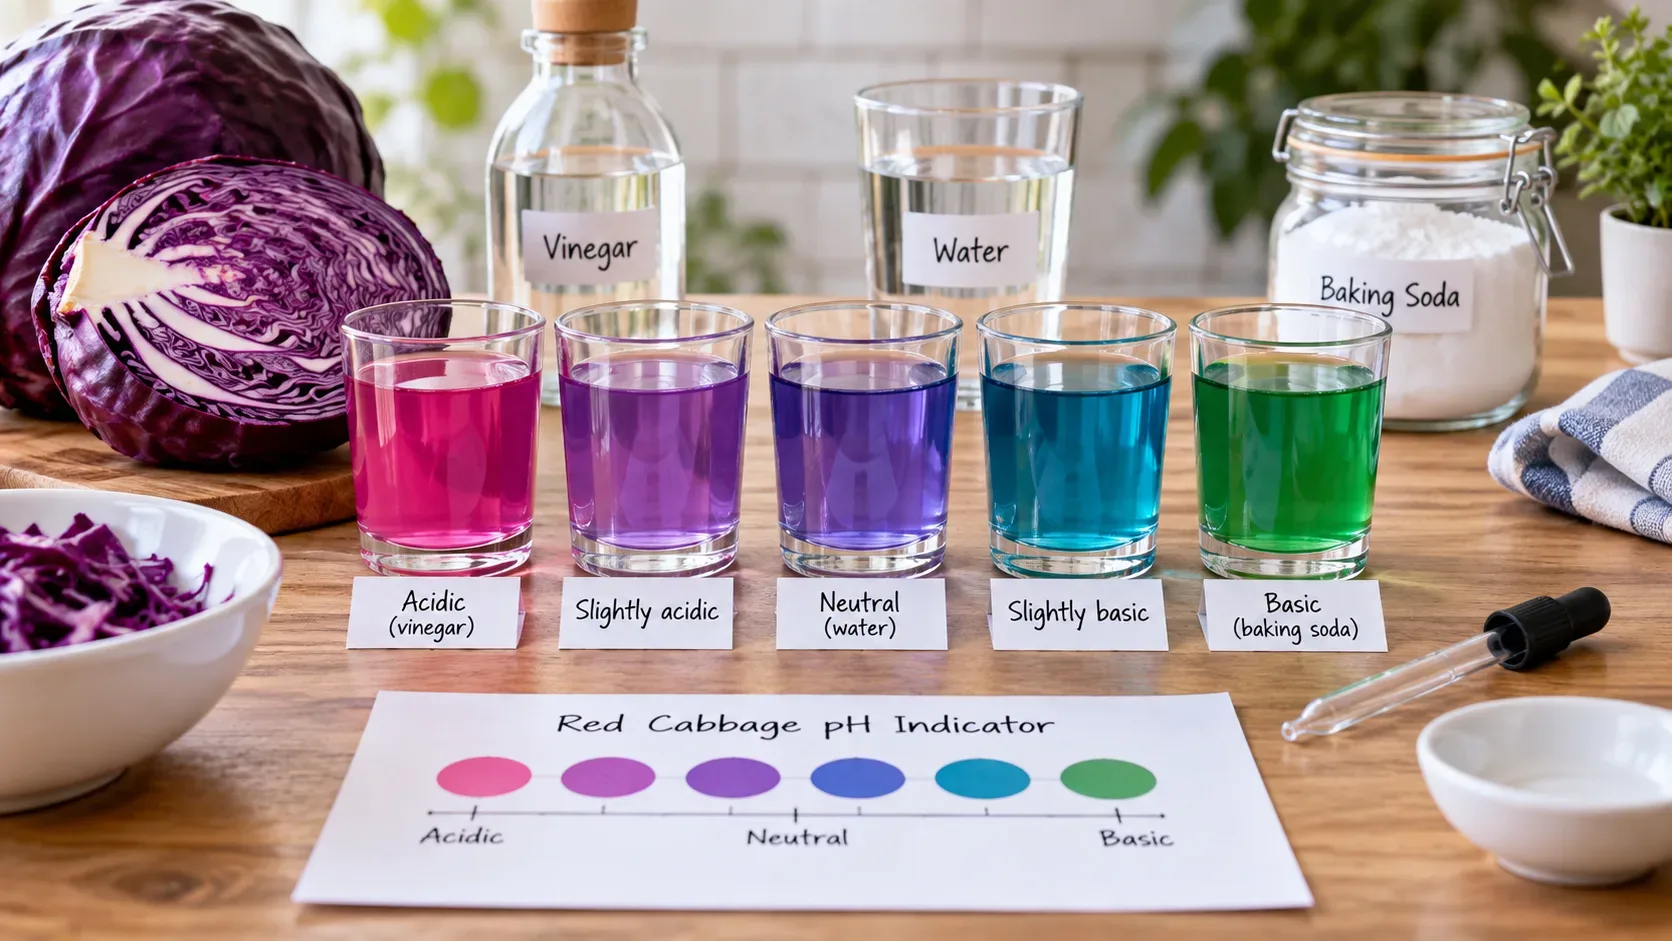
Red cabbage can work as an acid-base indicator because its pigments, mainly anthocyanins, change color as the medium becomes more acidic or more basic. The experiment is excellent for comparing samples, but there is an important difference between observing a color change and measuring an exact pH: without a scale prepared with known references, color can classify and rank samples, but it cannot reliably assign a precise pH number.
The most reliable way to run the activity is to use controls, keep quantities the same across cups, and record colors under the same lighting. That turns the result from “it looks pink” or “it looks blue” into a reproducible comparison.
Why red cabbage changes color
Red cabbage leaves contain anthocyanins, colored molecules whose structure changes under different acidic and basic conditions. The American Chemical Society (ACS) uses this principle in an educational activity: under acidic conditions, the indicator tends to become pink or reddish; near neutral, it is purple or blue; under basic conditions, it can shift toward green and, in more alkaline media, yellow-green.
Those colors are not a universal ruler. The shade you see depends on the extract, the concentration of the indicator and sample, the amount mixed, the lighting, and even the sample’s own color. For that reason, a scale printed from the internet is at best an approximate reference. Your working scale should be made with the same batch of indicator used for the tests.
What controls are and how they prevent guesswork
A control is a sample with an expected behavior that is already known and can be used as a comparison point. For a simple at-home version, three references are enough to guide interpretation:
- Acidic control: white vinegar or clear lemon juice.
- Near-neutral control: water.
- Basic control: a small amount of baking soda dissolved in water.
The goal is not to claim that each reference has one exact, fixed pH value in every home. The goal is to show, within the same experiment, how the indicator responds to an acidic, neutral, and basic reference. If an unknown sample looks close to one of those controls, you can classify it relatively.
At-home version: a simple, comparable protocol
1. Prepare one batch of indicator
Tear or cut a few red cabbage leaves and extract the pigment into water. At home, a safe option is to crush the leaves in water in a closed container or use hot water with adult help, then let the mixture cool before testing. The ACS describes a no-heat version that squeezes cabbage leaves with water until the liquid becomes strongly colored; the Royal Society of Chemistry (RSC) presents a heated classroom version.
Strain or remove the cabbage pieces and keep the liquid. For comparison, the key point is that every cup receives indicator from the same batch.
2. Set up the three controls
Use identical transparent cups. Put a small amount of vinegar in one, water in another, and baking soda solution in a third. Prepare separate cups for every unknown sample. Do not reuse the same cup between tests.
3. Standardize the quantities
Choose a ratio and repeat it. For example, use the same volume of sample in each cup and add the same amount of indicator. The volumes do not need to be large; consistency matters more. Mix in the same way and wait roughly the same amount of time before comparing.
4. Observe on a light background under the same lighting
Line the cups up side by side on a white surface. Avoid comparing one cup near a window and another under a warm lamp. If you take a photo, include controls and samples in the same image so the camera does not adjust color balance separately for each shot.
5. Use one container per sample
Use a clean dropper, spoon, or straw for each solution, or rinse thoroughly between uses. Cross-contamination can shift the color and create a false result. The ACS recommends using a clean cup and fresh indicator for every new item tested.
How to turn the colors into a useful scale
For an at-home activity, a qualitative scale is enough. Instead of writing numbers you did not measure, record ranges such as “acidic,” “near neutral,” and “basic.” A typical visual reference can be organized like this:
| Reference | Color that may appear | Safe interpretation |
|---|---|---|
| Vinegar or lemon | Pink, magenta, or reddish | Acidic behavior |
| Water | Purple, violet, or blue | Near neutral |
| Baking soda solution | Blue-green or green | Basic behavior |
The color names are deliberately broad. Extract from one cabbage may not produce exactly the same violet or green as another. Dark or cloudy liquids can also mask the indicator color.
Want to connect colors to pH numbers? Calibrate first
If the goal is a numbered scale, you need solutions whose pH is already known by another method. In a laboratory or classroom, a series of known-pH buffer solutions can receive the same amount of the same indicator. The resulting set becomes a reference scale for unknown samples.
A teaching procedure from Chemistry LibreTexts, for example, prepares known-pH references and then compares sample colors with them. That is the methodological point that matters: the number comes from the standard solution or an instrument, not from a color impression alone.
For school projects that require more precision, a teacher can use commercial pH paper or a pH meter to verify the references. Red cabbage remains useful as a visual demonstration, but it does not replace an instrument when the question requires a precise numerical measurement.
Supervised school version
In a school setting, the experiment can be expanded with solutions prepared by the teacher. The RSC describes a practical using a dilute acid, a dilute base, and water, together with eye protection and safety guidance. Another option, especially useful for building a scale, is to use buffer solutions of known pH.
To keep the procedure comparable, the class can use:
- the same volume of solution in every tube;
- the same amount of indicator;
- transparent, labeled tubes;
- a series of known references prepared by the teacher;
- one unknown sample per tube;
- a record of color before and after adding indicator;
- comparison under the same lighting.
If laboratory reagents are used, their selection, concentration, handling, and disposal should follow teacher instructions and institutional rules. The at-home version in this article does not require those reagents.
An observation table so you do not rely on memory
| Sample | Color before indicator | Color after indicator | Closest control | Interpretation | pH measured by another method, if available |
|---|---|---|---|---|---|
| Acidic control | Record | Record | — | Acidic | Optional |
| Neutral control | Record | Record | — | Near neutral | Optional |
| Basic control | Record | Record | — | Basic | Optional |
| Sample 1 | Record | Record | Compare | Infer | Optional |
This table separates observation from interpretation. First you write down what you actually saw; only then do you compare it with the controls. If there is an independent measurement, it belongs in its own column rather than being confused with the visual estimate.
Common errors that change the conclusion
- Using different volumes: a heavily diluted sample may produce a less intense color than another.
- Comparing different indicator batches: pigment concentration can vary.
- Reusing a contaminated dropper: traces of acid or base can alter the next sample.
- Testing very dark liquids: the original color can hide the indicator response.
- Photographing each cup separately: automatic camera corrections can make comparison harder.
- Assigning an exact number from color: without calibration, that claims more precision than the method provides.
Safety: do not turn the test into a cleaner-mixing activity
For the at-home version, prefer water, vinegar, lemon, baking soda, and other simple food-grade materials. Do not use the activity as a reason to combine household cleaners. The CDC warns that household bleach and disinfectants should not be mixed with other cleaners because hazardous vapors can be released.
Even with household materials, do not eat or drink experimental samples, wash your hands afterward, and keep children under adult supervision. If a substance already carries a hazard label, it does not need to be part of this experiment for the activity to work.
What a good red-cabbage scale actually shows
A good scale is not the one with the most numbers; it is the one that makes the comparison method clear. With three simple controls, standardized quantities, and side-by-side recording, you can convincingly show that some samples behave as acidic, some are near neutral, and others are basic. To turn color into numerical pH, add calibration with known standards or an independent measurement method.
That step turns the activity from a visual demonstration into a small experiment: it has references, repeatability, records, and an explicit distinction between what was observed and what can be concluded.