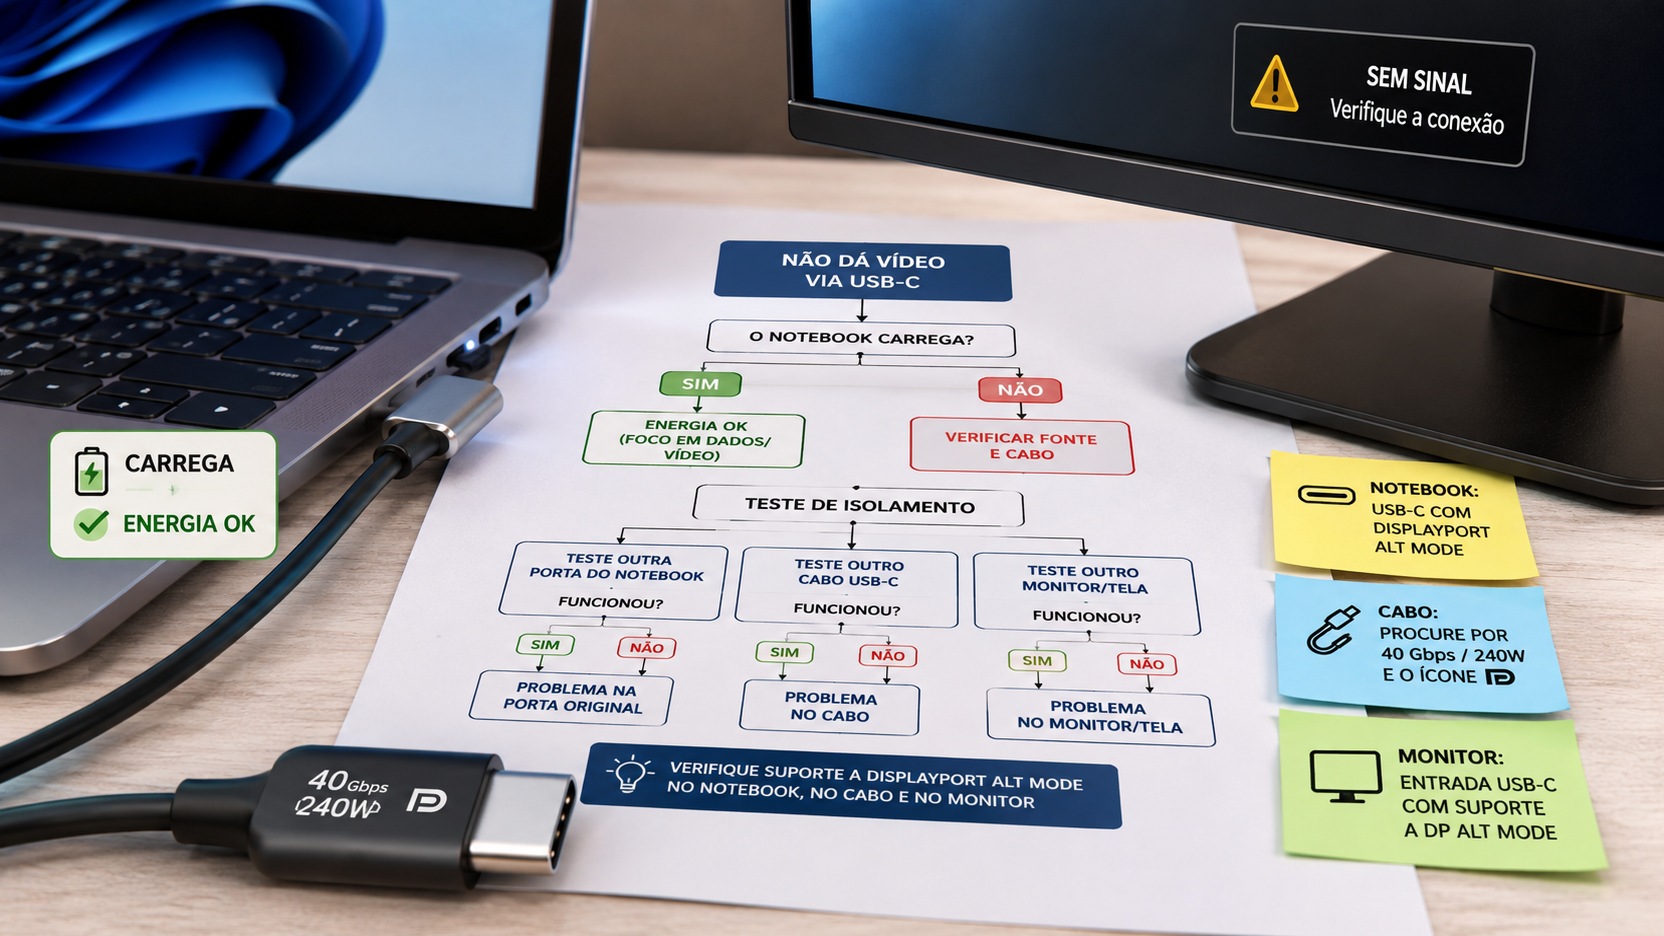
The notebook receives charge via the USB-C connection, the battery goes up normally, but the monitor remains “no signal”. This symptom is misleading because it seems to prove that the connection is working. In practice, it only proves that there is an energy path between the equipment. Video, USB data, and power can share the same connector, but they are different capabilities and must be supported by the port, cable, and display.
The quickest way to find the limit is to stop changing everything at once. First confirm that the notebook port is designed to transmit video. Then eliminate the cable as a variable. Only then test the input and monitor settings. This process transforms a generic “USB-C not working” problem into three verifiable hypotheses.
The starting point: USB-C describes the connector, not a single capability
Two notebooks can have physically identical ports and offer different functions. A USB-C port may exist for data and power only; another can add video output via DisplayPort Alt Mode; another may be part of a USB4 or Thunderbolt implementation with additional features. Therefore, the oval and reversible shape of the connector is not sufficient evidence that there will be an image.
In DisplayPort Alt Mode, part of the USB-C high-speed lanes is used to carry the DisplayPort signal. VESA describes this mode as the way to carry DisplayPort audio and video via the USB-C connector, which can coexist with USB data and power. The same physical connection, therefore, can load the computer without the video source being enabled or even existing on that port.
The practical consequence is important: if the notebook charges, do not conclude that the cable and port “are good”. Just conclude that food is coming. Video diagnostics still needs to be done separately.
Test 1: Confirm that the notebook port actually sends video
Start with the exact model of the notebook. Consult the manufacturer's data sheet or manual and look for expressions such as “DisplayPort over USB-C”, “DisplayPort Alt Mode”, “DP Alt Mode” or an explicit description of output to an external monitor via the USB-C port. On some equipment, the manufacturer also identifies the port with the DisplayPort symbol. VESA advises that this logo often appears near USB-C connectors with DisplayPort support, but the model documentation is the safest reference when the physical marking is missing or ambiguous.
If your notebook has two or more USB-C ports, do not treat them all as equivalent. There are models where only one port offers video, while another is intended for data, charging or different functions. Read the specifications for each port individually and, if there is video indication on only one of them, test it on that one.
When documentation only states data and charging and does not include video output, a regular USB-C to HDMI or DisplayPort adapter does not create this capability. The adapter relies on a video signal supplied by your computer. In this case, the solution is to use a video output that the notebook actually has, such as HDMI or DisplayPort, or to use an external video technology that works through another mechanism and has explicit support for the system.
What does the symptom “loads but does not display video” say about the port
It supports a port that negotiates power normally but does not offer DisplayPort Alt Mode. It is also compatible with a port that offers video but encounters an inadequate cable, incorrect monitor input, or negotiation failure. Therefore, the charge alone does not allow the door to be condemned or absolved.
Test 2: eliminate the cable as a variable
The second test must be done with a cable known to carry USB-C video. The ideal scenario is to use the cable provided with a USB-C monitor that the manufacturer states supports video, or another full-featured cable whose specification states it supports the intended use. A cable used only to charge a cell phone may have USB-C connectors on both ends and still not offer the necessary paths for a video link.
The current USB-IF markings help you understand why looking at power alone is insufficient. Certified USB-C cables can carry the power capacity, such as 60W or 240W, and, where applicable, the USB signaling rate. USB-IF itself highlights that there are 60 W or 240 W USB 2.0 Type-C cables whose data performance is up to 480 Mbps. In other words, a high watt number does not prove that the cable is suitable for video.
It is also not necessary to require “40 Gbps and 240 W” for any monitor. These numbers describe specific data and power capabilities, not a universal requirement for image display. A Full HD or 4K screen can work at much lower settings, as long as the entire chain supports the video mode and the required bandwidth. For diagnosis, the best question is not “does this cable charge much?” but rather “is this cable declared for USB-C video/DisplayPort Alt Mode and has it been tested on a connection known to be functional?”.
A cable test that truly isolates the cause
Keep the same notebook and the same monitor and just change the cable for one known to work for USB-C video. If the image appears immediately, the original cable becomes the prime suspect. If nothing changes, don't discard the old cable permanently yet; just move on to the intersection with another computer or another monitor.
Avoid placing a dock, hub, extender or adapter in the way during this step. Each intermediary adds another negotiation and another possible limitation. The cleanest isolation test is notebook directly to monitor with a single cable.
Test 3: Check if the monitor's USB-C port is actually a video input
On the monitor, confirm in the manual which USB-C port receives an image signal from the computer. Monitors with an integrated hub may have more than one USB-C connector, and not all of them perform the same function. The port intended for the notebook usually combines video, data and power supply, while other ports may exist only for peripherals or charging.
Then, open the monitor menu and select the source corresponding to the connection used. Microsoft's guidance for diagnosing external screens includes confirming the active video input on the monitor and, when this option is available, reviewing the port version or mode. A monitor configured for HDMI, traditional DisplayPort, or another source may remain “no signal” even with the USB-C cable connected and supplying power to the notebook.
If the correct USB-C input is selected, unplug the monitor for a few seconds, reconnect the power and reconnect. This forces a new detection between source and screen. Then, see if the operating system recognizes a second monitor.
The test cross that points to port, cable or monitor
If the same monitor and the same cable work on another notebook
The monitor-cable chain has demonstrated that it can transport video. Go back to the first notebook and check the specification of the port used again. If it does indeed offer video output, the investigation now includes system configuration, firmware, graphics drivers, USB-C, USB4 or Thunderbolt controllers when applicable, as well as possible physical failure of the port.
If another cable works on the same notebook and monitor
The original cable is the strongest suspect. It may be a charging-oriented cable, a model without the high-speed paths required for the mode used, or simply defective. In this scenario, replacing it with a cable whose specification states the required video support is more objective than trying to fix the problem with software.
If another monitor works on the same notebook and with the same cable
The notebook port and cable demonstrated the ability to transmit video in this combination. The focus moves to the first monitor's USB-C input, source selection, internal settings, resolution or refresh rate compatibility, and any limitations documented by the screen manufacturer.
If no intersection produces an image
Return to the documentation and look for a combination known to be supported. The most common mistake at this stage is assuming that all elements have video just because they all use USB-C. If port, cable and monitor are documented as compatible, then it makes sense to delve deeper into the software and firmware layer.
When the problem may be with Windows or firmware
If the hardware chain is compatible and has worked before, check whether the system detects the screen. On Windows, use Win + P to toggle between duplicating, extending, and using only one screen. In Display Settings, request a new detection and check if the monitor appears even when it does not show an image. Microsoft also recommends checking the selected source on the monitor itself, reconnecting cables and testing the adapter or screen on another device.
When the monitor is detected but loses signal when applying a certain resolution or refresh rate, temporarily reduce these parameters to test. If the problem started after updating, returning from sleep or changing the dock, it is worth installing the BIOS, firmware, graphics driver and USB-C/USB4/Thunderbolt components recommended by the notebook manufacturer, always for the exact model.
When the monitor does not even appear in the system and the cross-tests also fail, the priority returns to physical negotiation: correct port, video support, cable, monitor input and direct connection.
How to read symbols and numbers without falling into false certainty
The DisplayPort symbol near the USB-C port is a good indication of video output and is cited by VESA as common identification. The manual, however, must prevail because manufacturers may use different markings. Likewise, the 60W and 240W numbers on cables are about power; markings of 5, 10, 20, 40, or other ratings address certified USB performance when present. None of this data alone is a substitute for confirmation that the suite supports the desired video function.
This separation avoids two unnecessary purchases. The first is to change the monitor when the notebook port never had a video output. The second is to buy a cable with very high power or data rate when the defect was just a wrong input on the monitor. Diagnosis should follow the function that is missing, not the appearance of the connector.
The practical order to reach a conclusion
Start with the notebook manual and confirm video output on that specific USB-C port. Then connect directly with a cable known to work with video. Then check the correct USB-C port and source on the monitor. Finally, cross one element at a time with another notebook, another cable or another monitor. Each exchange must answer a unique question.
If the set charges, but does not produce video, the energy has already provided a clue: there is contact and power supply. What remains to be discovered is where the video path ceases to exist. When port, cable and monitor are tested separately, the problem stops being “mysterious USB-C” and becomes a limitation or localized failure, with a much clearer next action.